Showing posts with label all done. Show all posts

Monday, January 4, 2016

I have some completions! Woo hoo!

In the fall I shared a long list of "in process projects".  I joined the "2015 Fall UFO" group via a Ravelry Group called Quilters Knitting. I had to list at least 5 "in process" projects and make an effort to get "something" done, or (at the very least) to encourage others with their efforts. I visit the group threads everyday. Seeing every one's success (plus targeting a few of my own projects) resulted in a few completion's of my own!

fussy cutting and improv QAYG blocks in process

My first finish was a Quilt As You Go Table Runner that I think I had started earlier last year. It was primarily a stashbuster project. I used a panel that I had on hand and fussy cut the autumn themed leaves, sunflowers, nuts and pumpkins and went at it from an improv point of view from there. I highly enjoyed the process, but came to a complete halt when I hit the sashing bit (and into the UFO pile it went). I finally decided to pull it out, return to the tutorial and soldier on. I am embarrassed to admit how easy it was and how intimidated I had been. The technique is from The Quilting Edge. 

sashing added - QAYG in process
Finally finished!

With a heady feeling of success,  I pulled out my second "time sensitive" project. This was a Happy Holiday Runner that had been languishing from last Christmas.


I spent entirely too much time trying to create a great backing fabric using up my leftovers. In the end I was pleased and I guess the upside is I now have a reversible table runner!


I tried my hand at some free motion quilting (FMQ) with varying levels of success  - bearing in mind that no one who looks at my quilting efforts (in this house) has a clue!


Other than that I finished (finally) my Audrey Cardigan bribing myself that I could start another knitting project if I did.


I'm very happy with how it has turned out but I need to get used to the slippery / slinky feel it has. The yarn is a llama / silk blend and I'm used to warm and woolly yarns!

Well that's it for now. I've a few other thoughts mulling around in my head right now for this blog - just need to let them "moodle" a bit!

Happy New Year!

(Linked to the Needle & Thread Network WIP Wednesday)

Friday, April 26, 2013

Making on vacation!

We've been planning a mini vacation to Vancouver for a while now - just to get away from the last remnants of winter that we just can't seem to shake off. With that in mind I decided to make a sewing kit... And of course it's turned into a much bigger project than I originally intended. I found 3 fat quarters at my LQS and thought they were perfect for practising a bit of free motion quilting on and to use one of the buttons I've been collecting for awhile.

I ended up googling lots of tutorials and found Pinterest to be a great source of inspiration for design ideas. At the end of the day I didn't get the kit completed but got the "bones" of it together, so I've packed it along with some little scraps to make 1" hexagons and I was good to go.

Since I am a big time early riser even on vacation ( anytime between 5 - 7 am is not uncommon) I like to walk to the local beanery, grab a java and come home to stitch. We usually don't really "get going" til later so I can easily get a couple hours of meditative needle in - needle out in if I so desire...

Happy stitching!

Sunday, January 20, 2013

Finished!


First things first... Happy New Year! I had a great couple of weeks in hibernation. Santa was wonderful (as usual) and I am now the happy owner of a lightpad! This is the newest version of a light box. I began coveting one after my first fusible applique class - and could see the advantages of not having to tape everything up on the window for doing transfers. But I'll talk about that later (in a future post).

Now for the matter at hand. (See pic above). I've had the Abbey Bag pincushion & scrapcatcher pattern for a couple of years now. I was feeling a little overwhelmed by the number of incomplete stalled  in process projects I have going at the moment, so I needed something quick and easy that "smelled of success". I also needed a pin cushion. I had seen this particular pattern done up in the "Housework Whenever" fabric line - and being as that pretty much is my credo for life (think grave marker material) I finally found it online in an Etsy store. (I had to purchase a whole quilt kits worth however - so I anticipate I may actually go to my grave swaddled in the stuff).

I have to say I really enjoyed making this pin cushion. It has a little inside pocket to hold anything from your TV remote (I confess I do watch telly while sewing something repetitious) or my glasses. I'd never heard of using crushed walnuts for stuffing but was willing to give it a go - and I am converted! I liked it much better than rice. I found it at Petsmart and I probabely have enough to make pincushions for everything person in my neighbourhood. I initially overstuffed the cushion the first time round and had to dump it out and start over.


The pattern also called for "fabric glue" - again something that I've never used before. But I ventured on. I decided to alter the pattern using a velcro patch to attach the scrap catch to the pincushion because I haven't really found the best place yet to put them both together  - *being left handed I like to keep my pins etc to my left*- so most of my notion etc are all there.

(* I have just had a eureka! moment and gone to Google images to ask "how to pin a seam allowance" it looks like lots of people pin with the pin head going to the right. I do the opposite. Hmmmm - I've never seen that before. I was taught to sew by my mom who is also left handed - is that why? I will try this to see if I can actually pull out pins and pop them into my pincushion with it on the right side - if this works then the scrapcatcher has a perfect home!)


Okay - back to the better at hand - here is my pretty pincushion all done! I will make a few more in the future to give as gifts...the Abbey Bag is delightful! So based on my personal taste of fabrics selected and my abilities I give this project a big 4/5 thimbles up!


Saturday, December 31, 2011

Jumbo Christmas stockings...


So this year my goal was to "... get those stockings done!" I'd bought the pattern, fabrics, batting and threads last year - and of course I didn't quite get there. Although the boys are now 22 and 24 (as in years - not months)  I really needed to complete this so it wasn't technically a "quarter of a century" in the making. (They have had a Christmas stocking of sorts - but I always envisioned the handmade family heirloom that so many people talk about).


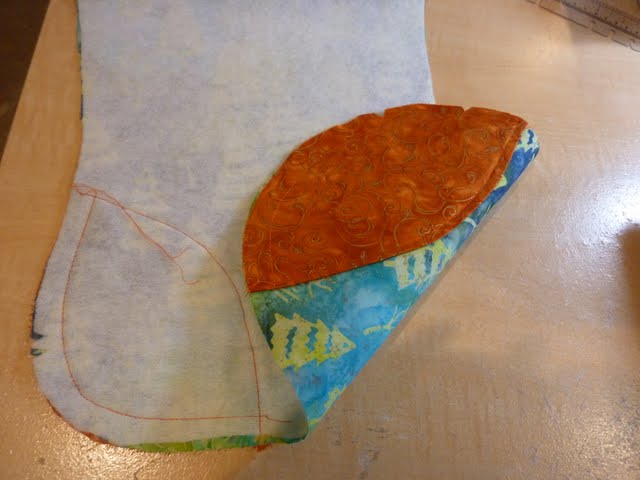
The pattern I bought (Simplicity 4842) was not a quilting pattern and I wanted to quilt something on the stockings; so I chose the heels, toes and cuffs. This of course required a few modifications (it always does) such as additional backing to the toes and heels, as well as some extra batting.


I am new to the whole "free motion" quilting concept, so my technique really isn't very good - but I forged ahead anyways.


As I worked away, it became readily apparent to me that the "medium size" stocking was immense. I'm of the mind set that stockings are hung and Santa traditionally puts in a box of pencil crayons, a magazine, a few little stocking stuffers (remember Mattel Hot Wheels?) and a bag of Christmas candies (which in our house has evolved into Holiday Skittles and the annual Christmas Terry's "Whack & Unwrap" Chocolate Orange). As I worked I could see that these stockings could easily replace any need for a tree at all.


Having said that, stocking number 1 was wonderful. Or so I thought. (Click here) Needless to say - stocking #2 is on hold


Monday, June 13, 2011

First Quilt is "finito!"


Well I am happy to announce, that after much humming, hawing, foot shuffling, room rearranging and excuses (let's face it I am a procrastinating aficionado) I have finished my first quilt. Which I started here.
In retrospect, I am feeling quite "sheepish" (ha! ha!) in that it took me so long to finish up - when all that was required was indeed "finishing up". As you may recall I was having problems with my machine during my class - first the tension was screwy - and I had forgot my sewing manual (which is a voluminous text which I have printed off the internet). I had to go home to retrieve it. By the time I returned to class, the instructor had solved the problem and I was now an hour behind. On Day 2 I raced to catch up and just as I approached the homestretch (binding 101) I had another machine malfunction and ... just... threw in the towel. I packed up my stuff and went home.
My instructor emailed and said to bring the quilt and binding in and she would show me how... I was soooo close!
Put you know how it goes. I went to hand quilting classes, and hand applique classes. I bought needles, and threads, and of course more fabric. I put up a design board. I bought books and magazines and DVDs. I bought another old sewing machine. I rearranged my room... one  more   time.
I got so desperate I even decided to clean out the Inbox on my email. And then I found it...

"....  August 25th, 2010: Here is a picture of you and your lovely quilt, don’t forget to come and see me as needed to finish up!"


And so on January 3rd 2011 - I did. And it was easy. And quick. And I was embarrassed that I had put it off for so long. I hand stitched the binding to the backing... and I learned on more thing.

I like sewing by hand.


 (Ps . I am late posting this because I wanted to have my "Made by Me - Label" on it. Haven't quite figured that out yet).